Jira Import Best Practices: A Step-by-Step Admin Guide
Master Jira import best practices with our step-by-step guide. Ensure smooth data transitions and avoid common pitfalls today!

The safest Jira CSV import starts with one small, validated test import before you touch production data. Run the first 30 rows through the import wizard, confirm your field mappings, verify that every user email resolves to an active Atlassian account, then schedule the full import during off-peak hours.
Before you open the Jira import wizard, run through this checklist:
- File format: Save as UTF-8 encoded CSV with a header row; the
Summarycolumn is mandatory. - User identifiers: Use email addresses or Atlassian Account IDs, not display names.
- Work item IDs: Include a
Work item IDcolumn and aParentcolumn if you're importing subtasks or hierarchies. - Attachments: Confirm every attachment URL is publicly reachable via HTTP/HTTPS from your Jira instance.
- Quoting: Wrap any field containing a comma, newline, or double quote in double quotes before you upload.
Pro Tip: Validate your first 30 rows manually in a spreadsheet editor before uploading. The importer only checks that slice during mapping, so errors in row 31 and beyond won't surface until after you've committed.
Key Takeaways
A successful Jira CSV import depends on preparing a compliant file, validating mappings with a small test run, and verifying results with JQL before treating the import as complete.
| Point | Details |
|---|---|
| Summary column is mandatory | Every CSV must include a header row with a Summary column; missing it rejects the entire file. |
| Pre-create all configuration | Statuses, work types, and custom fields must exist in the destination project before importing. |
| Use emails for user mapping | Email addresses or Atlassian Account IDs resolve users reliably; display names do not. |
| Test with 30 rows first | The importer validates the first 30 rows during mapping; fix errors in the CSV, then run the full import. |
| Split large imports by work type | Smaller batches reduce timeout risk and make error isolation straightforward. |
Table of Contents
- 1. How to structure your CSV file so Jira accepts it
- 2. Mapping CSV columns to Jira fields and handling users
- 3. Handling quotes, commas, newlines, and date formats
- 4. How to import parent/child relationships and issue links
- 5. What you need to know about importing attachments and comments
- 6. Batch sizes, performance, and when to split your import
- 7. Step-by-step: run a test import, validate, and verify
- 8. Common import errors and how to fix them
- 9. Copy-paste CSV templates for common import scenarios
- 10. Pre-import validation checks that catch problems early
- 11. When CSV import is the right call (and when it isn't)
- Plan your next migration with Swarm-stack
- Sources
1. How to structure your CSV file so Jira accepts it
The Atlassian CSV import guide is clear on the basics: every file needs a header row, Summary is the only required column, and fields are comma-separated. What the docs don't spell out as bluntly is how quickly a single formatting mistake cascades into dozens of failed rows.
Header row rules:
- Use plain, unformatted column names. Avoid punctuation in headers (no parentheses, slashes, or special characters).
- Column names are case-sensitive in some mapping contexts. Use
Summary, notsummary. - Repeat a column header to import multiple values into a multi-value field. For example, two
Labelcolumns will aggregate both values into the Labels field on the same issue.
Field separators and quoting:
Commas separate fields. Any field that contains a comma, a line break, or a double quote must be wrapped in double quotes. To include a literal double quote inside a quoted field, double it: "". A field like Needs "urgent" review becomes "Needs ""urgent"" review" in the CSV.
Date and time formats:
Jira parses dates using Java SimpleDateFormat patterns. The format you select in the import wizard must match the format in your CSV exactly. dd/MMM/yy and MM/dd/yyyy are both valid, but mixing them within a single file causes silent failures on mismatched rows.
Text length limits:
Organization name fields cap at 255 characters. Description fields accept longer text, but extremely long values slow the importer. Trim descriptions over 32,000 characters before uploading.
Here's a minimal sample CSV structure:
Row 2 and Row 3 are children of Row 1. The Parent column references the Work item ID of the parent row, and the parent must appear before its children in the file.
2. Mapping CSV columns to Jira fields and handling users
Field mapping is where most imports quietly break. The importer gives you a preview screen to match CSV columns to Jira fields, but it won't warn you about every mismatch. Some failures are silent: a column that doesn't map correctly just gets skipped, and you only notice the missing data after the import completes.
Required and commonly problematic fields:
Summaryis the only field Jira requires. Every other column is optional, but unmapped columns are dropped entirely.StatusandWork type(formerly Issue Type) must match values that already exist in the destination space. Importing into an existing space cannot create new statuses or work types. If your CSV containsIn Reviewand that status doesn't exist in the project, those rows will fail or default to the project's initial status.- Mandatory custom fields behave the same way. If a custom field is marked required in the project's work type configuration, every row must supply a value for it.
Custom field handling:
You can create new custom fields during import when you're importing into a new space. For existing spaces, pre-create every custom field in Jira's field configuration before you upload. Map the CSV column to the custom field by name during the mapping step. If the field type is a select list, the option values in your CSV must match the configured options exactly, including capitalization.
User mapping:
Using email addresses or Atlassian Account IDs is far more reliable than display names. Display names aren't unique across a Jira site; emails and Account IDs are. If a user doesn't exist in the site and auto-creation isn't enabled, the Assignee and Reporter fields are left blank on import. That's not an error the import log always flags clearly.
- Confirm every user email in your CSV exists in the Atlassian admin console before importing.
- For user-limited licenses, check whether importing will push you over your seat count. Jira won't block the import, but unresolved users leave fields empty.
- If you're migrating from a tool like Trello (see common Trello migration scenarios), display names are often the only user identifier available. Map them to emails manually before building your CSV.
Pro Tip: Add a Reporter column even when your source data doesn't include one. Without it, Jira assigns the importing admin as the reporter on every issue, which makes post-import filtering by original reporter impossible.
3. Handling quotes, commas, newlines, and date formats
Character escaping is the unglamorous part of CSV imports, and it's where the most time gets lost. A single unescaped comma inside a description field shifts every subsequent column in that row, producing data that looks correct in the import preview but lands in the wrong fields.
The rule is simple: if a field contains a comma, a newline, or a double quote, wrap the entire field in double quotes. To include a double quote within that field, write it as two consecutive double quotes.
The escaping rule that prevents most CSV parsing failures: wrap any field containing a comma, newline, or double quote in double quotes, and represent a literal double quote as
""inside a quoted field. This single convention eliminates the majority of row-shift and truncation errors in bulk imports.
Editors and export formats to avoid hidden characters:
Microsoft Excel sometimes inserts non-breaking spaces, smart quotes, or BOM (byte order mark) characters when saving as CSV. Google Sheets is generally cleaner for CSV exports. If you're using Excel, save as "CSV UTF-8 (Comma delimited)" and open the file in a plain text editor to verify the first few rows before uploading.
Carriage returns (\r line endings from Windows) can cause issues in some Jira import contexts. If you're seeing unexpected row splits, convert line endings to Unix format ( ) using a tool like Notepad++ or sed on the command line.
Date format precision matters more than you'd expect. The Java SimpleDateFormat specification distinguishes between MM (month as number) and MMM (month as abbreviation). A file with dates in 15/Jan/2025 format fails completely if the wizard is configured for MM/dd/yyyy. Pick one format for the entire file and configure the wizard to match it before you run validation.
Practitioners consistently flag quoting and escaping as the top source of bulk import failures. The Jira Guy's practitioner guide puts it plainly: quote everything that might contain special characters, not just the fields you know are problematic.
4. How to import parent/child relationships and issue links
Hierarchies are the trickiest part of a CSV import to get right, because the order of rows in your file determines whether the relationships are created at all.

Atlassian's CSV administration docs specify that parent/child imports require three columns working together: Work item ID, Work type, and Parent. The Work item ID is a unique identifier you assign within the CSV file. It doesn't need to match any existing Jira issue key. The Parent column on a child row references the Work item ID of its parent row.
The ordering rule is absolute: parent rows must appear before their child rows in the file. If a child row references a Work item ID that hasn't appeared yet, the relationship won't be created. The child issue will still import, but it will be orphaned.
Key columns for hierarchy imports:
Work item ID: unique integer or string per row, used only within this CSV.Work type: must match an existing work type in the project (e.g.,Story,Sub-task,Task).Parent: theWork item IDof the parent row. Leave blank for top-level issues.
Issue links vs. parent/child:
Parent/child relationships (epics to stories, stories to subtasks) use the Parent column. Peer issue links (blocks, is blocked by, relates to) use a different mechanism. For peer links, you typically need to use an External ID column and run a second import pass or use the Jira API after the initial import. CSV import doesn't natively support arbitrary link types between issues in the same file.
Pro Tip: Sort your CSV by hierarchy level before uploading. All epics first, then stories, then subtasks. A quick sort in Google Sheets on a "Level" helper column takes two minutes and prevents orphaned subtask issues entirely.
5. What you need to know about importing attachments and comments
Attachments and comments both import through the CSV, but neither works the way most admins expect the first time.
Attachments:
An attachment URL in your CSV imports as an actual file only if the Jira instance can reach that URL over HTTP or HTTPS at the time of import. If the URL requires authentication, is behind a VPN, or is on a private network the Jira cloud instance can't access, it imports as a web link instead of a file attachment. There's no error message for this. The import succeeds, but the attachment is a link, not a file.
Practical staging approach for attachments: upload files to a publicly accessible location (an S3 bucket with a pre-signed URL, a public CDN, or a temporary public share link) before running the import. Once the import completes and files are attached in Jira, you can remove the public URLs. Never rely on internal network paths or authenticated file servers for attachment imports.
Comments:
Comments follow a specific semicolon-delimited structure: createdDate;Creator;commentBody. The Creator field should be an email address or Atlassian Account ID. If the creator field is empty or doesn't resolve to a known user, the comment imports as anonymous. The createdDate must match the date format configured in the import wizard.
A single Comment column in your CSV holds one comment per row. To import multiple comments on the same issue, add multiple Comment columns with the same header name. The importer aggregates them onto the issue in order.
Attachment file size limits apply at the Jira site level. Check your site's attachment size limit in Jira settings before staging files. Attempting to import a file that exceeds the limit causes that attachment to fail silently.
6. Batch sizes, performance, and when to split your import
Large CSV imports don't just risk timeouts. They make troubleshooting exponentially harder. When a 5,000-row import fails at row 3,847, you're left parsing an error log to figure out which rows succeeded and which didn't. Splitting into smaller batches gives you clean failure boundaries.
Atlassian recommends splitting large CSVs and running imports during off-peak hours. Community practice has settled on batches of roughly 1,500 work items per file as a practical ceiling for reliable performance, though smaller batches of 500–750 rows are preferable when the data includes attachments or complex custom fields.
Before you schedule the import:
- Check available storage on your Jira instance if you're importing attachments.
- Confirm no other large background jobs (re-indexing, scheduled exports) are running during your import window.
- Notify your team that the project may be in an inconsistent state during the import.
Splitting strategies and their trade-offs:
| Strategy | Best for | Trade-off |
|---|---|---|
| Split by project | Multi-project migrations | Requires separate config files per project |
| Split by work type | Epics first, then stories, then subtasks | Preserves hierarchy order naturally |
| Split by date range | Large historical backlogs | May break cross-period issue links |
| Split by row count | Any large flat import | Simplest to execute; no semantic grouping |
Splitting by work type is often the cleanest approach for hierarchical data. Import all epics in the first batch, confirm they landed correctly, then import stories with parent references pointing to the newly created Jira keys, then subtasks last.
7. Step-by-step: run a test import, validate, and verify
A practitioner-recommended import workflow follows four stages: prepare, test, run, verify. Skipping the test stage is the single most common mistake admins make when they're under time pressure.
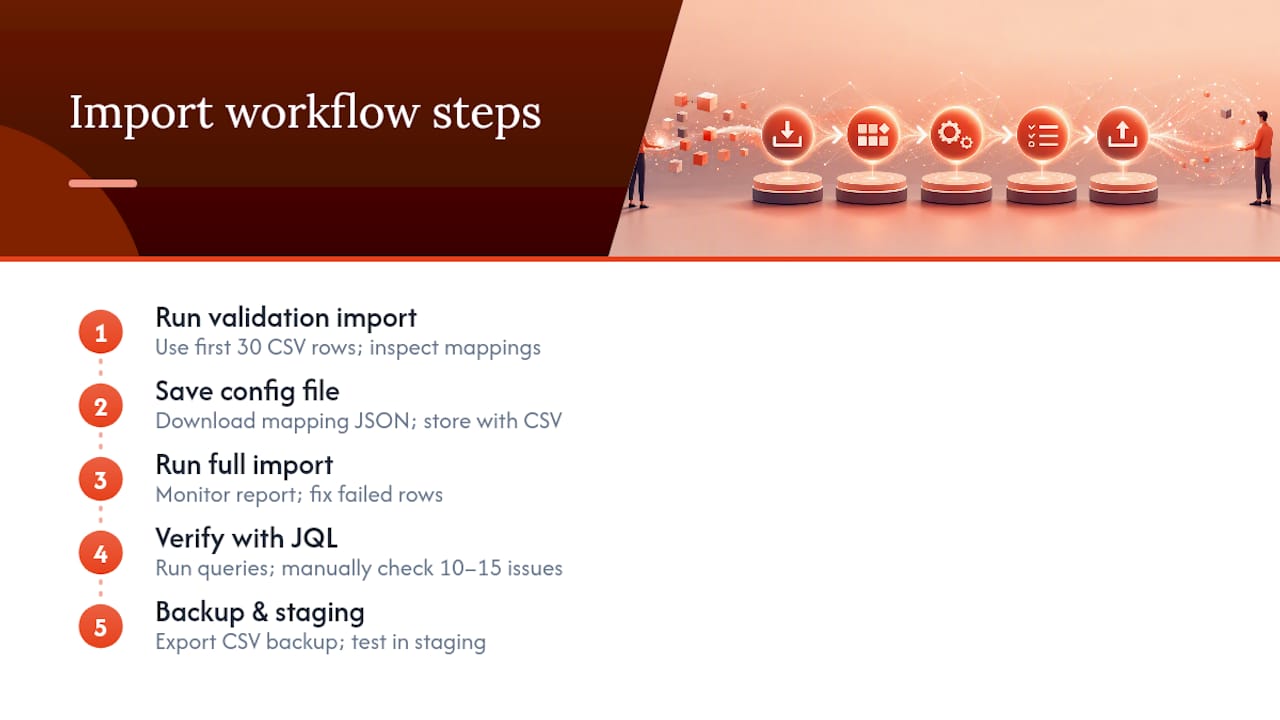
Step 1: Run a small validation import
Take the first 30 rows of your CSV and run them through the import wizard. The importer validates this slice during the mapping step and displays errors inline. Inspect every mapped field in the preview. Confirm that Summary, Assignee, Status, and any mandatory custom fields are mapping to the correct Jira fields. Fix errors in the CSV, not in the wizard, so your corrections carry forward to the full import.
Save your configuration file after the mapping step. The import wizard lets you download a configuration file that captures your column-to-field mappings. Save it before you run the import. For recurring imports or future migrations from the same source, this file means you skip the entire mapping step and go straight to upload and run.
Step 2: Download and save the configuration file
This step takes 30 seconds and saves hours on future imports. The configuration file is a JSON mapping that the wizard accepts on re-upload. Store it alongside your CSV in version control or a shared drive.
Step 3: Run the full import and monitor the report
After the test import validates cleanly, run the full import. Jira sends a notification when the import completes and generates an import report. Read the report before you do anything else. The report lists every row that failed, the reason for failure, and the row number. Cross-reference failures against your CSV and fix them before re-importing the failed rows.
Step 4: Verify with sample queries
After the import, run JQL queries to spot-check the data. A query like project = MYPROJECT AND created >= "2025-01-01" ORDER BY created ASC shows you the oldest imported issues. Check a sample of 10–15 issues manually: confirm assignees, statuses, parent/child links, and custom field values.
Pro Tip: Keep a rollback plan. Before importing into a production project, export the current project data as a CSV backup. If the import introduces bad data, you have a clean reference point. For critical projects, consider creating a staging project, running the full import there first, and only moving to production once the data looks right.
8. Common import errors and how to fix them
Most import failures fall into five categories. Knowing which error maps to which root cause cuts your troubleshooting time significantly.
Top errors and their fixes:
- Missing Summary header: The importer rejects the file entirely. Fix: add a
Summarycolumn to your header row. - Unmapped status or work type: Rows with unrecognized values fail silently or default to the project's initial status. Fix: pre-create all statuses and work types in the destination project before importing.
- User creation failures: Assignee or Reporter fields are left blank. Fix: confirm all user emails exist in the Atlassian admin console; add missing users before re-importing.
- Date-parsing errors: Rows with dates fail if the format doesn't match the wizard configuration. Fix: standardize all dates in the CSV to one format and configure the wizard to match.
- Attachment fetch failures: Attachments import as web links instead of files. Fix: move files to a publicly accessible URL before importing.
Reading the import error log:
The error log lists failed rows by number and gives a short reason string. Common reason strings and what they mean:
| Error symptom | Root cause | Fix |
|---|---|---|
| "Summary is required" | Summary column missing or empty | Add or populate the Summary column |
| "Invalid status" | Status value not in project config | Pre-create the status in the project |
| "User not found" | Email doesn't match any Atlassian account | Add user to site or correct the email |
| "Invalid date format" | Date doesn't match wizard format setting | Standardize dates; reconfigure wizard |
| "Attachment not accessible" | URL requires auth or is private | Stage file on a public URL |
When a row fails, fix it in the CSV and re-import only the failed rows. Don't re-import the entire file, or you'll create duplicates for the rows that already succeeded.
9. Copy-paste CSV templates for common import scenarios
These templates are minimal by design. Add columns for your environment; don't import columns you don't need.
Simple issue import:
Summary,Description,Priority,Assignee
Fix login redirect,Users are redirected to 404 after login,High,user@example.com
Update API docs,Document new authentication endpoints,Medium,dev@example.com
Parent/child import (story with subtasks):
Summary,Work item ID,Work type,Parent,Assignee
User authentication epic,1,Epic,,lead@example.com
Implement OAuth,2,Story,1,dev@example.com
Write OAuth unit tests,3,Sub-task,2,qa@example.com
Column order doesn't matter to the importer. What matters is that column names in the header row match what you map in the wizard, and that
Work item IDvalues are unique within the file. You can arrange columns in whatever order makes the CSV easiest to prepare and review.
External ID update import (updating existing issues):
External ID,Summary,Priority,Status
PROJ-101,Fix login redirect,Critical,In Progress
PROJ-102,Update API docs,High,Done
The External ID column tells the importer to update an existing issue rather than create a new one. Use the existing Jira issue key as the External ID value. This is the correct approach for bulk updates to existing issues.
Fields to customize for your environment:
- Replace
user@example.comwith real Atlassian account emails. - Replace work type values (
Epic,Story,Sub-task) with the exact names configured in your project. - Add custom field columns using the exact field name as it appears in Jira's field configuration.
10. Pre-import validation checks that catch problems early
Running a few targeted checks before you upload saves you from discovering problems in the import report after the fact. A structured validation approach catches the majority of failures before they happen.
Pre-import checklist:
- Confirm the header row includes
Summaryand no duplicate column names (except intentional multi-value columns). - Check for duplicate
External IDorWork item IDvalues. Duplicates cause unpredictable behavior during import. - Validate that every email in
AssigneeandReportercolumns exists in the Atlassian admin console. - Confirm that every
Statusvalue in the CSV matches a status in the destination project's workflow. - Verify that every
Work typevalue matches a configured work type in the project. - For hierarchy imports, confirm that every
Parentvalue references aWork item IDthat appears earlier in the file. - Check that attachment URLs return a 200 response when accessed from a browser or with
curl.
JQL queries to verify post-import results:
After importing, these queries help you spot problems quickly:
project = MYPROJECT AND issuetype = Sub-task AND "Epic Link" is EMPTYfinds orphaned subtasks with no parent.project = MYPROJECT AND assignee is EMPTY AND created >= "2025-01-01"finds issues where user mapping failed.project = MYPROJECT AND status = "To Do" ORDER BY created DESCshows issues that defaulted to the initial status, which may indicate status mapping failures.
Pro Tip: Import a 10-row slice of your real data first, then run these JQL queries against that slice before committing to the full import. Comparing the query results against your source CSV takes five minutes and confirms that mappings, user resolution, and hierarchy links are all working as expected. This is the closest thing to a dry run the CSV importer offers.
For teams managing risk across complex project data migrations, building this validation step into a repeatable checklist prevents the kind of silent data corruption that only surfaces weeks after the import.
11. When CSV import is the right call (and when it isn't)
CSV import is the right tool for a specific set of situations. It's fast to set up, requires no API credentials, and works well for ad-hoc bulk creation or limited-scope migrations where the destination project is already configured correctly. If you're moving a few hundred issues from a spreadsheet or a lightweight board tool into an existing Jira project, CSV is almost always the quickest practical path.
The limitations show up quickly when the scope grows. CSV import can't preserve advanced metadata like change history, workflow transition logs, or original creation timestamps with full fidelity. It can't create new statuses, work types, or workflows on the fly. And it doesn't handle complex permission schemes or custom notification rules. For migrations that need any of those things, an API-based approach or a dedicated migration tool is worth the upfront investment.
From a Swarm-stack perspective, the decision usually comes down to two questions: Is this a one-time operation, or will you need to repeat it? And does the destination project already have the configuration the data needs? If the answer to both is yes and yes, CSV import is fine. If you're migrating an entire Jira instance, moving between cloud regions, or building a repeatable sync between systems, look at the AI project management tools and API-based approaches that handle those requirements without manual CSV preparation.
Teams migrating from tools like Asana (see Asana migration considerations) often find that CSV works for the issue data but falls short for preserving custom field configurations and user permission structures. In those cases, a hybrid approach works: CSV for the bulk issue data, API calls for the metadata that CSV can't carry.
Plan your next migration with Swarm-stack
Getting the import right is only half the work. The other half is making sure the project structure, requirements, and deliverables your team imports into Jira are worth importing in the first place.
Swarm-stack brings together AI specialists and human experts in real-time structured sessions to help teams build project plans, RFPs, and deliverables that are ready to execute. Export directly to Jira, share with your team via a single invite link, and skip the back-and-forth that turns a clean migration into a messy one. See Swarm-stack's plans to find the right fit for your team.
Sources
The sources below are the canonical references for Jira CSV import work. Bookmark the Atlassian docs before you start any import; the practitioner posts surface the practical edge cases the official docs don't cover.
Start with Atlassian's official CSV import documentation before anything else. The three core pages cover file preparation, the import wizard workflow, and the rules for importing into existing spaces. Between them, they answer the majority of questions that come up during a standard migration.
Atlassian official documentation:
- Import work into an existing space in Jira using CSV | Jira Cloud | Atlassian Support
- CSV Imports: The Secrets of Bulk Jira Issue Creation
Practitioner resources:
Reference: